

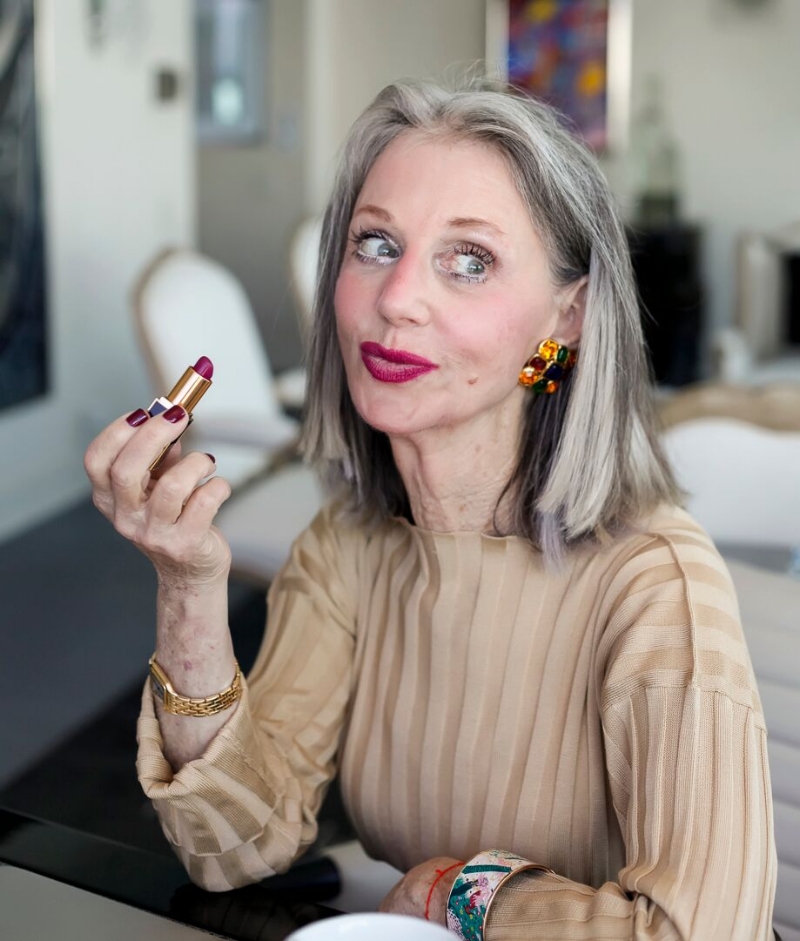
Professional makeup artist Elise Marquam-Jahns is back today to teach us how to glam up, even when we’re all still stuck inside. Watch her wonderful video, then read all about how she applies her glamorous evening makeup routine. Enjoy, Darling!
Going Glam! Pro-Makeup Artist Tips for Creating an Evening Glam Look for Women 50+
Since we’re all taking special health precautions right now during this challenging time and many of us are staying at home, I thought it would be fun to take some time to experiment and create an evening look just for the sheer fun of it.
Though I have absolutely no place to go after creating this evening glam look, I hope I can provide some inspiration on ways you might “amp up” your day look to a special evening look when we do get back to normal.
So, let’s go glam! I’m going to start with my eyes because that’s where we can really have some fun creating a more polished look for the evening. Evening lighting allows us to go just a bit stronger with our makeup look.
I’m mentioning the products I’ve used to create this look, but of course, you can use these same techniques with any of your makeup products that you particularly love.
First Steps
I like to start off by applying a lip balm so it can absorb into my lips while I apply the rest of my makeup. My favorite is one called The Naked Bee since it has no harmful ingredients and comes in a variety of wonderful fragrances. Then I like to apply an eyeshadow primer to my eyelids and entire eye area so it can thoroughly dry before I apply my eyeshadow. Urban Decay tinted eye primer in “Eden” covers up the discoloration I have on my eyelids while also ensuring that my eyeshadow will not crease or smudge.
And since most of us are washing our hands far more frequently these days, I can’t go without frequent application of hand cream. I’m using Essentiel by Adele. It’s a botanical blend of essential oils and extracts and is formulated with Hyaluronic Acid, MSM, Coffee Berry, and Raspberry Leaf.
Eyebrows
Normally, I would just apply a powder eyebrow product or eyebrow gel to my brows, but to create a more polished, evening look, I’m first applying my ABH powder duo to my brows, then using Maybelline’s Brow Tattoo Cream Pomade. After combing through my brows with a spoolie, I finish the look by applying Almay’s Brow Styler gel to ensure that some of my wiry brow hairs stay put. And, I didn’t do this step, but you can create an even more polished eyebrow look by applying a light line of concealer directly above and below the brow and then blending it out.
Glamourous Eyes
For my eyeshadow, I’m using two different eyeshadow palettes. First, Natasha Denona’s, “Mini Lila” Palette and ColourPop’s, “It’s My Pleasure” palette. I’m using “Flint” from the “Mini Lila” palette in my crease (which is a soft mid-tone brown shade) combined with the color “Fan Fiction” (which is a pink shade) from the, “It’s My Pleasure” palette.
On the outer corner/outer lash line I’m first applying “Poisonberry” (which is a maroon-purple) from the “Mini Lila” palette and then applying “Blue Dahlia” (a deep blue)—which has a bit of shimmer—on top of the “Poisonberry.”
These two glam colors combine to create a lovely blue/violet color. I complete the eye shadow look by bringing both of these colors into the outer area of the crease and blending. To soften the edges of the eyeshadow I use the “vanilla” color I’ve used on both of my eyelids. This is the “French Vanilla” color from Laura Geller’s Baked Highlighter Duo.
Eyeliner
Normally I’d use brown eyeliner, but since we’re going for a special occasion look, I’m using Maybelline’s gel pencil eyeliner in “Strikingly Navy.” I am, however, using the “Flint” eyeshadow for eyeliner on the bottom, outer 1/3 of my eye. Two coats of mascara finish up the eye look for now—but stay tuned at the end for a surprise “finishing look” for the eyes!
Foundation
After applying a hydrating primer (Eve Pearl’s “Priming Moisturizer Treatment”), I combine a bit of several foundations to get the look I want. Since I’m looking for good coverage plus a bit of a glow, I’ve used a matte, heavier coverage foundation on the inner portion of my face (Clinique’s “Beyond Perfecting” foundation) and combined a bit of two other foundations for the outer part of my face to provide some extra glow (Clinique’s Even Better and Even Better Glow Foundations). Application with a dense buffing brush ensures that the foundation melds beautifully into the skin.
Contouring
To add some depth and dimension to my face, I’m using light cream contour down the center of my face and on the nasal labial folds (so they don’t look so prominent). I’m using a darker contour along the top of my forehead, under my cheekbones and along my jawline. Using the dark contour color under my cheekbones makes the cheekbones look more prominent and using the contour along my jawline helps that area look a bit more “toned.”
To create the softest looking contour application, I put the cream contour on the back of my hand, then absorb most of it with a sculpting brush and apply. To ensure that all my makeup blends together seamlessly, I apply the slight bit of foundation I have left on my foundation buffing brush along the edges of all the contouring.
Blush and Highlighter
I apply my blush (Ilia’s cream stick blush “At Last”) and highlighter (YBF’s Crème Illuminator) with a soft, angled brush using the same technique I used to apply the contour. I apply the blush in an upward sweep starting at the center of my cheekbone and going up toward my ear. The highlighter goes directly above the blush in the same upward motion.
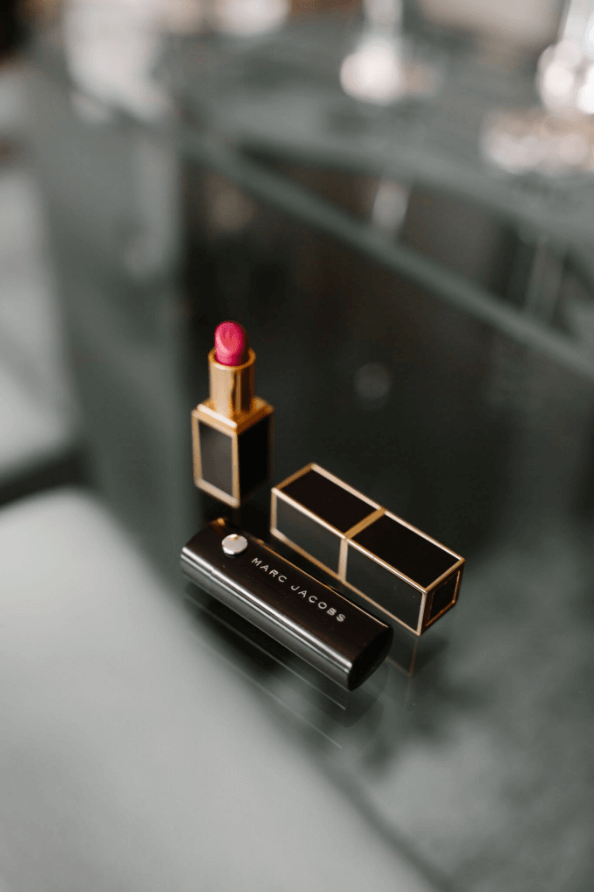
Glam Lips
To finish the look, I’ve added a lip color that works with the cool undertone of my skin (a deep raspberry/burgundy) and topped it with a matte lipstick, a more luminous lipstick and gloss (all of which have unfortunately been discontinued). If you don’t have issues with your lipstick migrating, you definitely won’t have to take all of these steps. But since I do have issues with lipstick migrating, I take these extra steps to prevent this from happening.
They are, concealer around the stretched-out edges of my lips, then Elf’s Lip Lock Crayon along the same stretched out edges, followed by Revlon’s Color stay Lip Liner in “Wine”. If you don’t have issues with lipstick migrating, just go with a lip liner that matches your lip color or your lipstick color followed by a luminous lip color and gloss if you’d like some extra glow.
The Final Surprise Touch
False eyelashes can add a gorgeous finishing look, but many of us find the application process to be a bit daunting. Several years ago a new product came on the scene—magnetic false eyelashes—which sounded promising. However, the early versions of these lashes—which required sandwiching your own lashes between two magnetized sets of lashes—was just too cumbersome for most of us.
But, the most recent iteration of magnetic lashes involves applying magnetic eyeliner and one set of magnetized lashes—which is far easier. However, not all brands of this new version are created equal. A brand that works far better than many is the Kiss brand of magnetic eyeliner and lashes since there are five small magnets along the base of each lash. All that’s needed is to shake the magnetic eyeliner well, apply a medium-thick line, and wait for it to dry thoroughly. Then the magnetic lashes will literally just “latch on” to the eyeliner! It also helps to add a second coat of the eyeliner just to each end of your eyeliner to provide some extra hold for the lashes.
And voila! There you have it. Sometimes it’s just fun to take a little extra time and a few more steps to “glam up” your look for that special occasion!
Do you have any questions about how to glam up for Elise? Let us know in the comments at the bottom of this page!
Elise Marquam-Jahns is a professional, working makeup-artist who is passionate about helping women 50+ get their glow back. In addition to her work as a makeup artist for a major cosmetics line, she founded Boomer and Beyond Beauty and recently launched her “Boomer and Beyond Beauty with Elise” YouTube channel for women 50+. Elise is also an author and speaker and hosts Normandale Community College’s monthly Learning Well Edge Talk Radio show where she interviews experts in the field of health and wellness.
If you enjoyed this article, please subscribe. You will get each daily story delivered straight to your inbox.
+ show Comments
- Hide Comments
add a comment